Saturday 29 November 2014

Wendy Rowe Makeup Artist

Wendy Rowe

Wendy Rowe Mood board

Wendy Rowe is the creative beauty consultant for Burberry Prorsum. She has worked with the brand for over a decade working with Christopher Bailey on the brands makeup range and does the makeup for all Burberry campaigns. Most of her childhood was spent fascinated by models, fashion and film. This lead to her career in makeup. She studied classic makeup artistry and then sent pictures of her work to every makeup artist whose work she liked, offering to assist them. Through this, Dick Page became her mentor and the first show she worked on was Prada! She now spends her time between London and New York working on editorials for the likes of Gucci, Louis Vuitton, and Chloe and of course, Burberry Prorsum.

Wendy Rowe Burberry Beauty Campaigns

Wendy Rowe’s sheer determination is what inspires me the most, as well as her organisation and knowledge of her trade. This is why she is so successful. Her work on the Burberry beauty campaigns are my favourite pieces of her work. She shows off the brand beautifully with her clean flawless bases. One of my main interests within this industry is creating a flawless base as I think it sets off the rest of the makeup and shows it at its best. 

References
1-      Wendyrowe.com, (2014). [online] Available at: http://wendyrowe.com/media/filter/portfolio/img/gm_53c565c9_a25c_4645_9013_20230a627753.jpg [Accessed 4 Dec. 2014].
2-      Wendyrowe.com, (2014). [online] Available at: http://wendyrowe.com/media/filter/portfolio/img/95.jpg [Accessed 4 Dec. 2014].
3-      Wendyrowe.com, (2014). [online] Available at: http://wendyrowe.com/media/filter/portfolio/img/112_2.jpg [Accessed 4 Dec. 2014].
4-      Wendyrowe.com, (2014). [online] Available at: http://wendyrowe.com/media/filter/portfolio/img/vogue_italia_april_2012_3.jpg [Accessed 4 Dec. 2014].
5-      Wendyrowe.com, (2014). [online] Available at: http://wendyrowe.com/media/filter/portfolio/img/97.jpg [Accessed 4 Dec. 2014].
6-      Wendyrowe.com, (2014). [online] Available at: http://wendyrowe.com/media/filter/portfolio/img/74.jpg [Accessed 4 Dec. 2014].
burberry ad 1- Wendyrowe.com, (2014). [online] Available at: http://wendyrowe.com/media/filter/portfoliothumb/img/172.jpg [Accessed 4 Dec. 2014].
burberry ad 2- Wendyrowe.com, (2014). [online] Available at: http://wendyrowe.com/media/filter/portfolio/img/116.jpg [Accessed 4 Dec. 2014].
Info-  Fashion.telegraph.co.uk, (2014). How I got here: Wendy Rowe, make-up artist - Telegraph. [online] Available at: http://fashion.telegraph.co.uk/beauty/news-features/TMG10634691/How-I-got-here-Wendy-Rowe-make-up-artist.html [Accessed 20 Nov. 2014].

Thursday 27 November 2014

25.11.14 Use of electrical equipment for texture

25.11.14

Use of electrical equipment for texture- Hot sticks, crimpers and crimping techniques

This lesson concentrated on the different techniques and tools that can be used to create a crimped effect and ample texture in the hair. I applied three different techniques to create a crimped effect.

The first technique involved using a large geisha pin  and is called rick- racking. This method involves applying the pin to the hair root and wrapping the hair around the pin in a figure 8 motion whilst keeping the hair pulled tight. Once all the hair was wrapped around the pin, I used hair straighteners to apply the heat which would set the hair in this shape. When the hair was heated through, I allowed it to cool completely while still wrapped around the geisha pin. Doing so would create a tighter and longer lasting shape. I carefully removed the grip from the hair to reveal a very strong dynamic tight wave. The hair can be left like this or brushed through for an afro effect.


The second technique I applied was creating a wave using hot sticks. To create a wave, I twisted the hair as I rolled it around the hot stick. If I wanted to create a curl, I would simply wrap the hair around the hot stick without twisting it. Twisting creates more of a zig-zag wave. 


The third method I applied to create a crimp effect was simply plaiting a section of hair and then applying heat with the straighteners. The tighter the crimp, the smaller and tighter the plait. I didn't heat the plait for as long as I could so only a slight crimp was created. If I were to use this method to create a crimp, I would hold the straighteners on the plait for longer. 


Overall, I think my application of the different crimping methods was adequate. I am especially pleased with the rick-racking technique I had applied. I had never seen this method before but found I picked up the wrapping technique quite quickly. I was really pleased with the results and will definitely use this technique again when creating a dramatic hairstyle. 


18.11.14 Corrective Makeup Techniques- Catwalk Lip.

18.11.14

Corrective Makeup Techniques- Catwalk Lip.

This lesson focused on creating a high fashion catwalk lip, likely to be seen on a Vivienne Westwood or Alexander McQueen catwalk show.

Products used

  • Mac Pro concealer palette
  • Mac gel liner- Blacktrack
  • Vaseline
Although only a few products were used to create this lip look, it creates a dramatic effect suitable for a high fashion catwalk show. 

To begin, I assessed my model, Maisie's lip shape to distinguish the shape I was going to create. I then used my Mac Pro concealer palette to mix together a shade that matched her skin tone. I applied it over her cupids bow to hide her natural lip line and blended it out around the face to keep the base natural. I drew a slightly exaggerated line, using the Blacktrack, to trace the inner part of the cupids bow then created the exaggerated point. Once the 'M' shape was mapped out, I lined the est of the lip along her natural lip line. Doing this really exaggerated the cupids bow while still keeping the lip look wearable. Once the lip was completely filled, I applied Vaseline to add shine and texture. I made sure not to take the Vaseline right up t the lip line to avoid the Blacktrack bleeding and smudging. 

Problem solving


Once i had finished applying the Blcktrack, I stood back and assessed the shape of the lip in the mirror. From this distance I noticed the left side of her lip was thinner than the right. To overcome this, I applied more Blacktrack in soft feathered motions to keep my line as straight as possible. I kept standing back to assess and retouching until I was happy with the shape.

Overall, I am pleased with the finished result. I am beginning to assess my makeup in the mirror more, which is making the finished result a lot better, as I can see areas that need retouching. If I were to recreate this makeup, I would make the overall shape of the cupids bow more dynamic as I think the overall shape of my lip is quite safe. However, i am pleased with the symmetry and application.

Maisie rocking the catwalk lip

Up close


18.11.14 Use of electrical equipment- curling tongs, straighteners, conical wands.

18.11.14
Use of electrical equipment- curling tongs, straighteners, conical wands.

Tools used
  • Barrel tongs
  • Pin clips
  • Pin tail comb
  • Postiche brush


This lesson concentrated on applying different techniques that can be used to create different types of curls. Curls can be created in many different ways including Carmen rollers, hot sticks, hair straighteners, curling tongs and conical wands as well as pinning the hair to create pin curls. In this lesson we practiced with different types of wands and tongs.

It is important to assess your clients hair before styling to decide which heat setting should be applied. If the hair is quite thick and already has a natural wave, a higher heat setting is required. If the hair is thin and wispy, a lower heat setting is required to avoid burning the hair. If I were creating curls whilst on set, a setting spray would be apt to hold the curls shape longer.

Once I had decided which hair style I wanted to create, I picked the size tong I thought would be most appropriate. I opted for a classic Hollywood hairstyle and chose large barrel tongs to create the large soft curls. I plugged the tongs in, making sure the safety clip was on and wires were kept out of the way. I sectioned the hair no thicker or wider than the barrel tongs and directionally wound the hair inwards as the hair would be worn swept to the side, with the soft curls draping over the shoulder. Before moving onto the next section, I applied a pin clip to hold the curl in while I curled the rest of the hair. Doing this allows the hair to cool and set in this shape. If I had not applied the pin grips to hold the hair, the hair would have dropped and set like this. When curling the final front sections, I curled the hair inwards to frame the face and achieve a Hollywood glam look, ensuring to protect the face by placing the tail comb between the scalp and tong. When the hair was completely cooled, I carefully removed the grips one by one and styled the hair using my postiche brush to smooth out curls and create lift where it was needed.


Problem solving

Once I had dressed out the hair, I noticed my dolly’s hair was too short to achieve the style i had in mind. If I had to fit this brief on a client and their hair was too short, I would have used clip in extensions to add length and volume. 

Overall, although the finished result wasn’t quite what I envisioned, I still produced a neat and wearable hairstyle and I can see I was along the right lines of achieving a Hollywood glam hairstyle, as could my tutor Emma. 

11.11.14 Blow- drying. Creating volume

11.11.14

Blow- drying. Creating volume

This lesson focused on creating volume and movement in the hair using specific blow drying techniques. In today’s lesson I used a dolly head, which I simply dampened using my spray bottle to return the hair to its natural alpha keratin state, as the hair is hygroscopic.

I began by sectioning the hair no wider than my large radial brush and dampening with water. It is important to for each section i am drying to be kept damp as this helps to produce a smooth finish. I then positioned my brush directly under the root of the hair and pulled upwards and outwards from the root as I applied heat from the dyer; however I kept the airflow direction pointing down towards the points of the hair to ensure the cuticle scales laid flat. I continued sectioning and dampening each section of hair and pulling upwards from the root. To aid the lift and volume of the hair, I used Velcro rollers. These would be ideal on set if the client had to wait around after. It would stop the volume in the hair from dropping. After a while I carefully removed the rollers and back combed the top section of the hair using my pastiche brush to add extra volume and height to the hair.

Problem solving
The only problem that occurred whilst dressing out this look was creating soft neat ends. The hair on the dolly head can become quite frizzy and unmanageable. I overcome this by applying more heat to the ends of the hair and creating as much tension as I could with my brush. This helped smooth out the ends.

Dampened hair. Before. 

Volume I created at the root
Volume created at the roots
Velcro roller application
Volume and lift finished result. Back


Volume and lift finished result. Front

Overall, I felt confident applying the correct blow drying techniques to achieve this look. I think my speed could have picked up a little, as a lot of my time was spent trying to cause as much volume and lift with the radial brush and dryer and smoothing out the ends.


Sunday 23 November 2014

11.11.14 Lip Masterclass

11.11.14

Lip Masterclass

This lesson focused on the different products and methods of application to use for creating different lip looks, ranging from classic to high fashion styles. My tutor Branka demonstrated a classic red lip, a dark ombre lip and a glitter lip.

The classic red.
Products used
·         Mac lip pencil- Cherry
·         Mac lipstick- Ruby Woo
·         Mac Prep+Prime loose powder- Translucent


The classic red lip is timeless and is often the colour used to add a touch of glamour. There is a red tone suitable for every skin tone and once the skin undertones have been recognised, you can begin by choosing a red lipstick with more warm or cool undertones. Ruby Woo is a universal red that works well with most skin tones. 

http://bellabox.sg/magazine/wp-content/uploads/2013/05/lipstick-swatches.jpg

I began by lining my model, Molly’s lips. It is always beneficial to balance your hand while applying lip liner. It will ensure a neater lip line and give more confidence to the makeup artist. To create a neat line, I lightly leant on my models shoulder and used this arm to balance my right hand (the hand I was applying the liner with). This method of application was taught to me by Branka and it has really helped with steadying my hand and liner application. I started by lining her cupids bow, checking if they were naturally even or not and then lining the centre of her lower lip. I then joined up the two areas. I kept standing behind my model and looking at the makeup through the mirror to assess if the application was even. It wasn’t, so I kept lightly feathering the pencil onto the lip line and checking in the mirror until I was happy with the overall shape. Next I applied Ruby Woo to her lips using a lip brush and worked in the colour. Ruby Woo is a very matte lipstick so if you notice the models lips are dry when assessing, it is best to apply some balm. The last step was to matte the lip by applying translucent powder to the lip with a fluffy brush through a 1 ply tissue. Using the tissue allows a small amount of product to settle onto the lip and keep the lipstick in place. Making the lipstick matte ensures it will last longer.
Products used
·
Red lip application closeup

Red lip applocation

Products used
·         Kryoan Rouge palette- shades LC10, LC308
·         Mac Feline Khol Power liner- Black
·         Mac lipstick- Ruby Woo
Ombre Lip’s are a favourite style of mine, especially when used with dark tones. This is the style we were creating today. This vamp ombre lip was created using Kryolans rouge palette and a black liner. I began by mixing my vamp colour together and applying it over the entire lip then lined the lip using black pencil, filling in the corners of the lip completely. Lining the lip after enabled the liner to blend in with the lipstick with ease for a softer look. I then used the same brush I applied the lipstick with to blend in the black liner until no lines were visible. To complete the look and ad more depth to the ombre effect, I applied Ruby Woo to the centre of the top and bottom lip.

Vamp ombre lip


Products used
·         Mac Blacktrack
·         Vaseline
·         Fine glitter
Creating a glitter lip was a lot easier than I thought it would be. This specific lip look would be perfect for photographic work because Vaseline is used. It will eventually move around and start to break down makeup. The first step was applying Blacktrack on the entire lip.  I would never think to apply a black base to make a product stand out, usually opting for white or no base at all, but the Blacktrack worked beautifully at creating a strong flat base.  I then applied Vaseline, using the same brush over the entire lip, making sure not to miss any areas or the glitter would not stick. I then got my model, Molly to tilt her head back slightly with her mouth open slightly and loaded a clean brush with loose glitter. I gently patted on the glitter, being careful not to get any in her mouth. The glitter clung to the Vaseline immediately, which made the application quite quick.

Glitter lip close up

Glitter lip

Overall, I think I did well in all three applications and all three looks suited Molly. My favourite look to create was the ombre lip. The look I would like to practice more is the classic red as this is the lip that really needs to be perfect in shape as it is so timeless and sophisticated and does all the talking!
I practised all three looks again at home to gain confidence in the three different application techniques.

Step by step red lip

Step by step ombre lip

Step by step glitter lip

Products used


04.11.14 Smokey Eye Makeup


04.11.14

Smokey Eye Makeup

This lesson focused on creating a classic smokey eye, using black gel liner, along with black eye shadow for maximum effect.
After watching Branka’s demo and taking notes, I began to re-create this look on my model, Holly. After moisturising her skin (she had already cleansed) I applied gel liner to the entire upper lid and shaded it upwards, up to the crease. This would map out my areas for shading and also add depth to the colour. Once happy with the application, which had to be done relatively fast as the liner dries quickly, I began to apply and blend black eyes shadow. The eye shadow is what really creates the smokey effect, so blending evenly is important. I followed the natural lines of my models eye, so the eye shadow wasn’t taken out too far above or outward. I think when creating a black smokey eye, the shape should be kept more natural, as the darkness is so intense. To balance out the intense black makeup, I applied soft brown tones along the crease, to blend with the black shading. This softened the makeup and made it more wearable. I highlighted the brown bone and then applied the gel liner along the waterline. Applying dark liners to the waterline makes the eye appear smaller and sultry in shape, whereas a lighter shade will open up the eye and make it appear bigger.
A full coverage application works best with this particular look, as is it more suited to evening and special occasion makeup. I opted for Mac Studio Fix fluid foundation as a base, as it has a medium to full coverage. I used shade NC15 to match my models skin tone. I used Mac shade Mid-peach to conceal under her eyes. This peach shade counteracts any blue tones under her eyes, as it is opposite on the colour wheel then I applied a very light dusting of powder with a fluffy brush because the foundation is quite matte. A dewy base would complement the smokey eye, so I did not want to over powder and add anymore of a matte effect.
I contoured her cheekbones and jaw line, using the darkest shade 117 from the Morag Ross Le Maquillage Palette and blended out any harsh lines using a contour brush and my foundation brush that already had product on it. I then used Mac pigment in Vanilla to highlight above her cheekbones and down the centre of her nose. This technique, along with using brown tones with the smokey eye, adds definition and stops the makeup looking flat.
Finishing touches to the smokey eye makeup- I carefully applied black eye shadow using a small brush to line under her eyes and join it up to the black shadow applied to the upper lid and then applied mascara to the top and bottom lashes. Finally, I pencilled in her eye brows. I opted for a slightly darker shade to fill her brows, as it would complement the darkness of her eyes better.

I ran out of time before I could apply blusher and a lip colour.

Branka's demo
 
My smokey eye application on Holly


My smokey eye application on Holly OPEN

My smokey eye application on Holly CLOSED

Problem solving
This lesson concentrated on creating and applying techniques for a classic smokey eye. However, my model Holly did have misshapen eyes. If she were a client, I would have used different application techniques in an attempt to correct her eye shapes. I would have applied less shadow under her right eye, as it is bigger and lower than the left, and slightly more shadow under her left eye to make it appear bigger. I would have also not taken the shading up as high on her right upper lid to make the eye area seem smaller.

Overall, I really enjoyed creating this makeup look. I had never actually created a black smokey eye and had always opted for brown tones. I think my blending and shading techniques were applied well. Once I had applied the gel liner over the lid, my confidence grew with blending the different brown and black tones to create this sultry look. I am disappointed I didn’t finish in time; although I am pleased I completed the eye makeup.
Products used
·         Mac gel liner- Blacktrack
·         Ben Nye Glam Shadow palette- shades Shell, Mink Stole, Coco Brown
·         Mac eyebrow pencil- Lingering
·         Mac Haute & Naughty mascara- Black
·         Mac Studio Fix fluid foundation- NC15
·         Mac Pro concealer palette- Mid-peach
·         Mac Prep+Prime looe powder- Translucent
·         Morag Ross Le Maquillage palette-  117
·         Mac pigment- Vanilla


21.10.14 Corrective Makeup Techniques- Eye shapes

21.10.14

Corrective Makeup Techniques- Eye shapes

Eye liner.

This lesson concentrated on eyeliner application techniques, different brushes and products that can be used and different shapes that can be made.

Eyeliner can come in the form of aqua colour, gel, pencil, cake and liquid. They will all create different textures, shades and shapes and suit different looks.
Branka demonstrated using a cake liner with a thin brush and gel liner with an angled brush to show the different ways eyeliner can be applied.

My model requested a thin line, so I tried to please her needs as well as fit the brief. I used aqua colour and a detail liner (BC480) to line her right eye, starting from the centre. I then got my model, Zainab, to look to her right, while I lined to the inner corner of her eye. This would help avoid blinking and panic as the brush comes towards her eye! Finally, with my models eye closed. I lifted the outer corner of her eye from her eyebrow, to create a nice raised shape to apply the flick. As the eyeliner was applied so thinly, I didn’t bring the flick out too far opting for a subtler look.

Aqua colour


 I applied gel liner to Zainab’s left eye, using an angled brush (BC510). Again, I lined from the centre and filled the line to the inner corner. In contrast to the application before, I created the flick from the outer corner and worked my way in to the centre. This technique was made easier using the angled brush, although I favoured the other technique.

Gel liner

I found using the gel liner more difficult than I thought it would be. I only really have experience using eye pencils and liquid to line. I found it did not glide on s well as the aqua colour, which made keeping the line coherent a litter tougher. This can be seen on Zainab’s left eye. The line needed to be made thicker toward the outer corner. A rigid line is clearly visible.

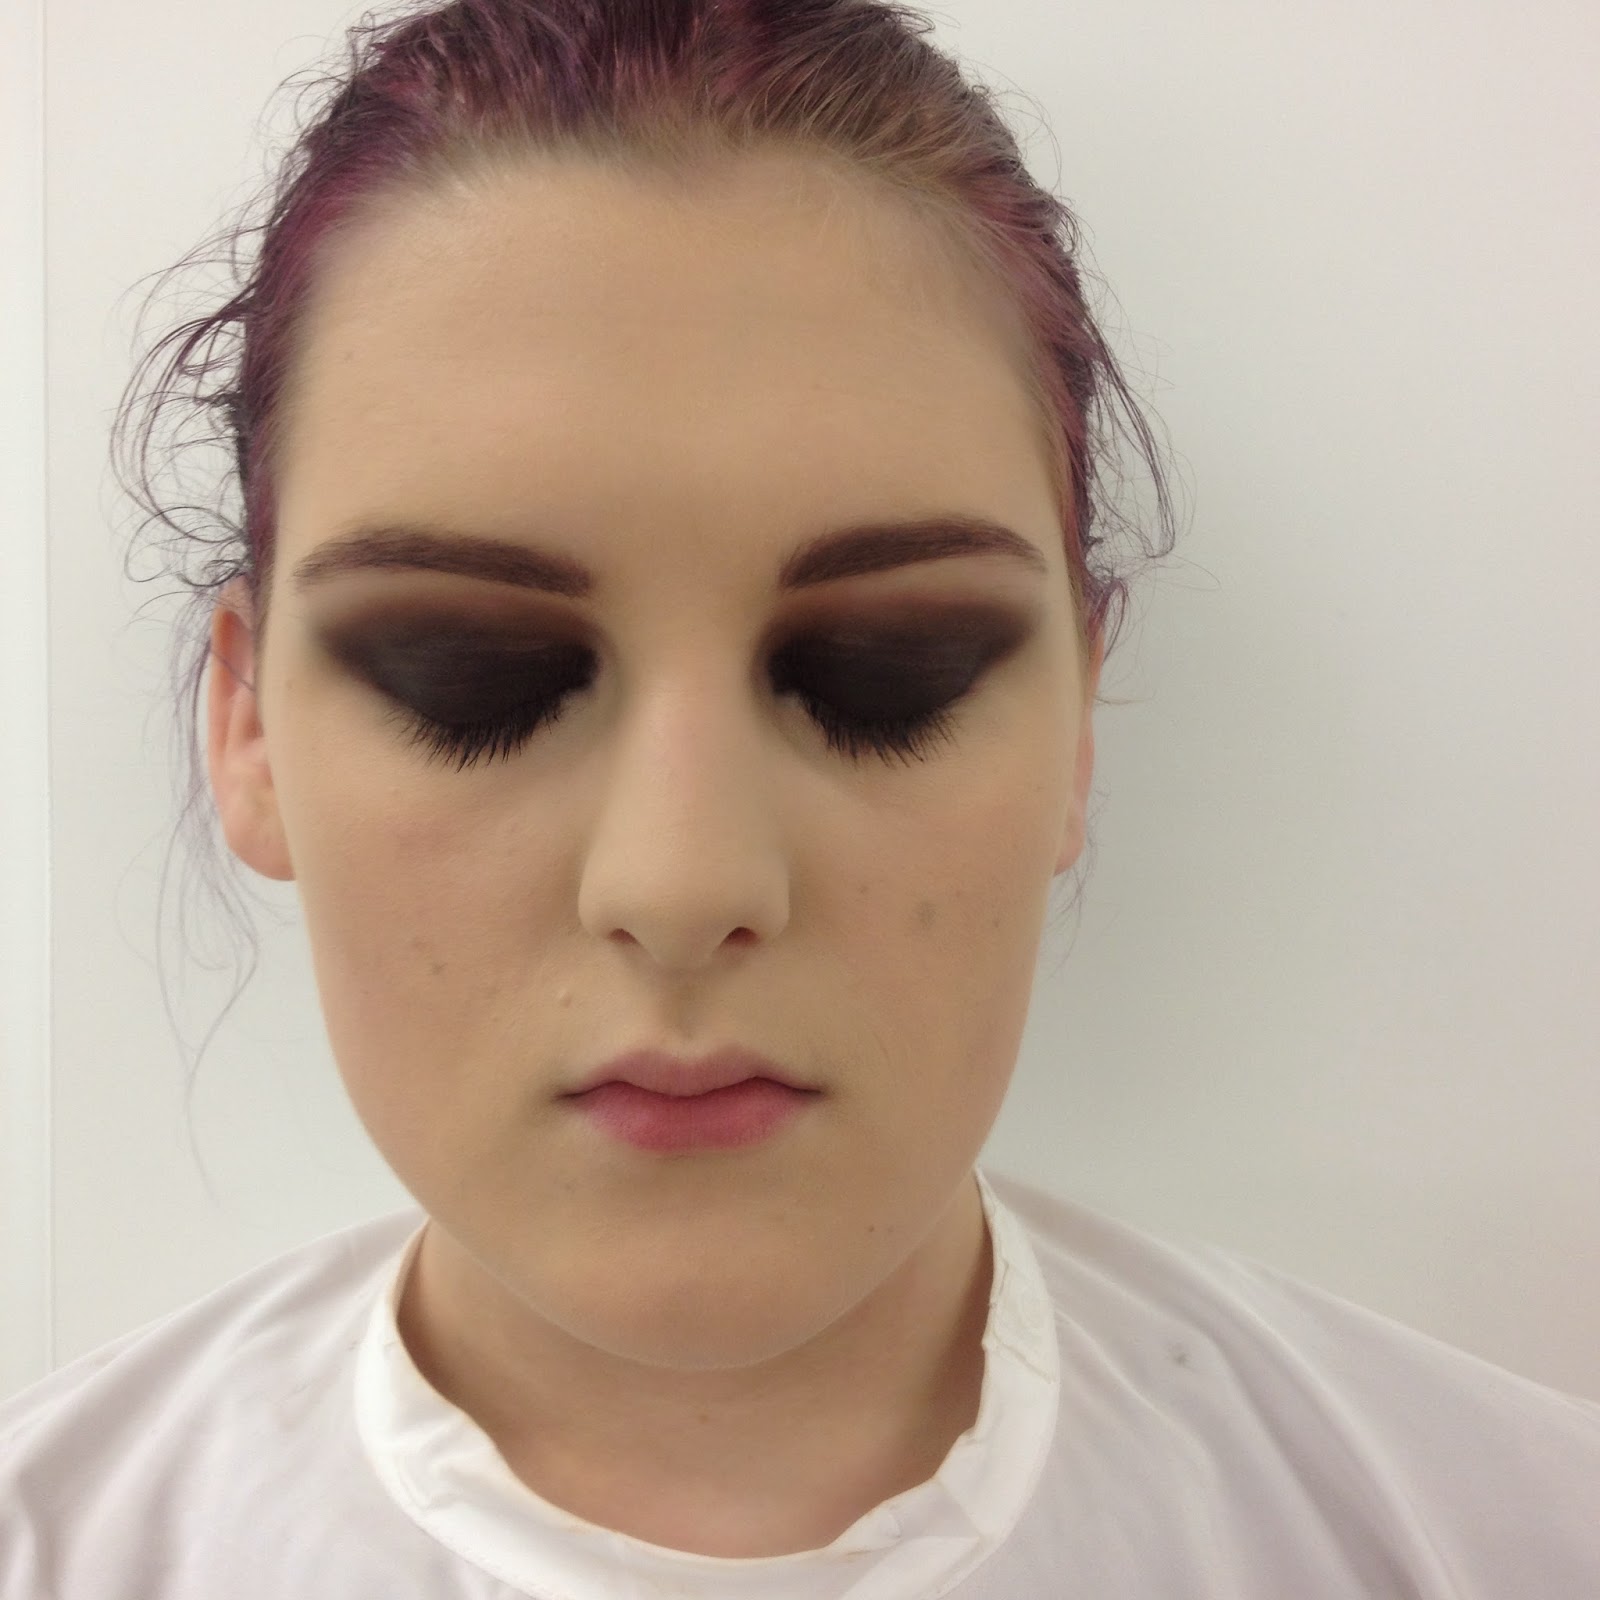
The next part of the lesson required creating a high fashion makeup look, including eyeliner techniques. I decided to apply eyeliner under each eye in a circle. The circles would have to be neat and symmetrical and lay on the bottom lash line.
I applied a full coverage foundation to compliment this high fashion look, using Mandy Gold and Morag Ross Le Maquillage palettes along with Kryolans derma palette. I am really interested in makeup for darker skin tones and I really assessed Zainab's skin to achieve the correct colour and avoid the skin looking ashy. This can be a common problem with darker skin tones, especially black and Asian skin. Zainab's skin has very warm gold tones, especially around her cheeks so I gradually mixed colours, avoiding any pale shades of yellow. I think my interest in makeup for black skin really helped with my foundation selections for her base makeup. I was able to distinguish that her skin had golden undertones, rather than red for example.
I set the base with Ben Nye’s banana powder, as this shade really enhances her natural gold tones without making darker areas of her face look ashy.  I contoured her cheeks and jaw line to slim her face and highlighted her nose, brow bone and cheekbones. Thee Vanilla pigment worked beautifully with her skin tone and gave the makeup a nice clean and fresh look.
I used the aqua colour to apply my eyeliner design, as it is more movable than the gel liner. I opted for the thin brush for precision. After placing a dot under each eye for a guide, I filled the area, making sure to keep each dot as symmetrical as I could. I did not apply mascara to the bottom lashes, as it would distract from the design.
To complete this high fashion look, a bold lip was needed.  I opted for a red lip, to compliment Zainab’s golden skin tone. Mac’s Ruby Woo really warmed up the entire look and added a simple, yet effective edge.

High Fashion makeup look

High Fashion makeup look

Overall, I am really pleased with the finished makeup look. I think it really fit the brief of being a high fashion look. I gained some confidence with my eyeliner application after seeing the results and how pleased my model was with the end result. I can feel my confidence growing with foundation colours and application too.


Products used
Morag Ross Le Maquillage palette- C.1
Mandy Gold Le Maquillage palette- 59, 182
Krolan derma colour palette- D13 (added to make base colour) D32 (under eye correction)
Mac pigment- Vanilla (to highlight)
Ben Nye eye shadow- Mink Sole, Coco Brown, Au Naturelle, Cobblestone (to contour)
Kryolan Aquacolour- Black
Mac lipstick- Ruby Woo
Ben Nye- Banana powder

Fashion eye liner practice
Dramatic Eyeliner

I decided to practice my eyeliner techniques at home. I used Mac Blacktrack, as this was the product I struggled with most in class. I began by assessing my eye shape. As my eyelids are not hooded or bulged, I do not face too many problems with eye liner shapes. If I were to apply a basic eye liner on a hooded eye, I would make the line a lot thinner, so some of the lid was still on show. I would also concentrate more on the outer corners of the eye to make the eye appear wider.

To create this look, I followed the natural lines of my eye shape, along the top lash line and crease line to gather a fluid design that complemented my natural shape. I built upon this until I was happy with the shape, then concentrated on making my points neat. I then incorporated eye shadow into this look to show how the look could be adapted.

21.10.14 Shampooing and Conditioning Techniques Blow Drying Techniques

21.10.14

Shampooing and Conditioning Techniques
Blow Drying Techniques

Lesson objective: to successful apply effleurage, rotary and petrissage massage movements when washing hair and using the correct blow-drying techniques to achieve straight shiny hair.

Tools used

  • Shampoo
  • Conditioner
  • Large Comb
  • Radial brush or Denman
  • Sectioning clips
  • Mousse
  • Hair dryer
  • Towles
Blow drying.
When blow drying hair, it is important to section. This makes the drying process easier to avoid tangling and also ensure any wet hair is kept away from dry sections. The dryer must not be left on a section of the hair for too long to avoid burning the hair or scalp and the dryer must be pointed downwards to ensure the cuticle scales lie down. To aid hydrogen bonds to harden into the new shape created by blow drying, it is best to allow the hair to cool before dressing.

I began by making sure my models clothing was protected with towels before getting comfortable at the basin. I asked my model, Alicja, if she had any skin conditions or concerns before wetting the hair. It is important to ensure your safety, as well as the clients to reduce any skin damage or spread disease. Hair and skin conditions can vary from different forms of alopecia, folliculitis and impetigo. Treatment would be needed for folliculitis and impetigo.

After her hair was fully saturated, I shampooed the hair, applying effleurage and rotary massage movements, making sure to cover the nape of her neck, as this area can sometimes be forgotten. Usually, shampoo would be rinsed and re-applied but Alicja had washed her hair that morning, so I only applied shampoo once before conditioning. 
I smoothed the conditioner over her hair (which I gently rung out) before applying the petrissage massage movement. 
I rinsed the conditioner out; making sure my hand stopped any water from going onto her face, until the water run clear. I wrapped her hair in a towel and escorted her to her seat to begin blow-drying. 
I gently combed her hair through to remove any tangles, as her hair is very long then rough dried her hair. This makes the hair more manageable for drying and speeds up the drying process. After doing so, I sectioned her hair, no wider than my radial brush i was using and began drying, ensuring my brush and the hair dryer was aiming downwards. This would make the hair straight and shiny, as the hair cuticle is flattened. 

Front Before
Front AFTER
Back before
Back AFTER
Overall, I felt confident washing and blow drying Alicja's hair. Having previous experience in a salon aided my salon etiquette and guaranteed I completed in time, although her her was very long and thick! I applied a new technique, shown to me by my tutor, Emma. It involved holding the brush on top of the hair and pulling down while aiming the blow drying downwards. This technique worked very well and i would like to practice this further and pick up my speed with this technique. My model was very pleased with the finished result. 

14.10.14 Corrective Makeup- Corrective colour, highlight and shade techniques


14.10.14

Corrective Makeup- Corrective colour, highlight and shade techniques.

Natural sheer highlight and contour application
The first step i took in creating this makeup look was assessing my models skin to while cleansing and moisturising to see if her skin was dry or oily, for example. My model, Charlotte’s skin was clear and didn’t have any problem areas. So I began mixing up a base colour from my Morag Ross Le Maquillage palette whilst assessing her colouring. It is important to keep looking back at the model when mixing a colour to ensure it a good match. I mixed together a little bit of the neutral shade with ivory and peach tones from the palette. (124, C.1, 14). Once I was happy with the colour, I added a mixing medium (1/4 foundation to ¾ mixing medium) and buffed it into the skin. I checked my application for brush marks and worked the product into any areas that needed more coverage, like around the nose and around the eyes (added D32 to counteract any blue tones) before dusting translucent powder under the eye and around the nose. I did not powder the entire face to keep the makeup looking sheer. I powdered under the eyes to stop creasing and around the nose for shine control as this area can often become quite oily. I then dabbed a highlighter onto her cheekbones, brow bone, and bridge of her nose, cupids bow and chin. I highlighted these areas as they are most prominent from the face. I added a little translucent powder to set the highlight then began mixing a colour to use as a contour. I used Ben Nye’s Glam Shadow palette to create a contour colour that was not too brown and had some grey tones, so the colour appeared more natural. I applied the contour the cheeks, jaw line and sides of the nose. A tip for contouring is to contour where you have highlighted and vice versa.  This is what creates the 3D effect in this makeup.  The base complete, I mixed a soft pink shade to apply to the apples of my models cheeks using my Kryolan derma palette and then filled her brows using the Kryolan derma palette. Using this palette to fill the brows creates a soft natural look.  The look was complete.
Overall, I enjoyed applying this makeup more than I thought I would as I do love a Kim Kardashian highlight and contour makeup look! However, I do think this particular makeup suited my model more than a heavier application would due to her fair colouring. I felt confident mixing a base colour and blush colour but I do think the contouring could have been a bit more prominent, although it is a subtle look. If I were to work on this makeup again, I would have applied more contour colour to the cheek and jaw to change the shape of the face more.
Products used
·         Morag Ross Le Maquillage palette- shades 124, 14, C.1
·         Kryolan Derma palette- D32 under eyes, D11 on eyebrows
·         Mac Prep+Prime loose powder- Translucent
·         Nars Illuminator
·         Ben Nye Glam Shadow palette- shades Smokey Taupe, Mink Stole, Au Naturelle

·         Kryolan Rouge palette- LC003, LC006, LC007

My model Lottie with natural highlighting and contouring makeup

Soft contour on the cheek and jaw line


Me rocking the no makeup look!
Highlight and Contouring- heavier application/ Red carpet look.
For homework, I had to create a heavier highlight and contour makeup look. This involved using a full coverage foundation and applying darker shading when contouring. After cleansing, toning and moisturing, I assessed the colouring on my neck to achieve a perfect base colour, using the Morag Ross LeMaquiliage palette. I didn’t assess for colour on my forehead as I would on a client because fake tan made my neck appear darker than my face. I then applied D32 under my eyes to conceal any dark circles, before applying more base colour to any areas that needed more coverage, like around my nose. I mixed a slightly lighter colour to conceal under my eyes and blend in the D32. I lightly dusted powder over my face to set the makeup before mixing together a highlighting shade, using my Kryolan derma palette.
D32 removed any darkness under my eyes

                                         
Full coverage foundation using Morag Ross Le Maquiliage palette
. Using the same foundation brush, I highlighted my cheekbones, the bridge of my nose, cupids bow, eyebrow bone and chin. I then mixed together a contour shade using the same palette. Using the same brush once again (to help the makeup blend as the colours were quite harsh), I contoured my cheek area, temples, down the sides of my nose and along my jaw line. I blended the contour shade out until it appeared as a natural shadow. I lightly powdered again to set the makeup I had just applied, then applied an illuminating makeup to add extra highlight and give a more dramatic effect. To add a more dramatic effect to the contoured areas, I used my Ben Nye Glam shadow palette to mix a natural shadow tone and applied it sparingly over the makeup I had already applied to contour. I added grey tones to keep the shading looking natural and more like a shadow, rather than a tan line! This is when the makeup really started to come to life and have more dimension. To complete this look, I mixed together a blush tone from my Kryolan rouge palette and applied it to the apples of my cheeks and my lips with my ring finger. I assessed the colour of my every day blush and recreated it. I found this easier, now that I have revised colour theory in more depth. As advised, I used the Kryolan derma palette to fill in my brows using gentle strokes. I applied mascara and eyeliner to balance the look.

Colour match using Kryolan Rouge palette LC006, LC003, LC004, LC001

Finished look. 
Overall, this is the makeup I felt most comfortable doing. I am a massive fan of highlighting and contouring and the effects it has. It really adds dimension to the makeup. I enjoyed learning about the different methods and products that can be applied, as I have relied on the same products for years. I think Mac's Vanilla pigment works beautifully for highlighting, although I only had Benifit's Highbeam to use at home.

Problem solving

When looking back at the pictures I had taken of my makeup, I was not happy with the colour I had used to fill my eyebrows. I opted for the shade D16 in my derma palette, as I use a dark brown pencil to fill them normally. However, looking back, I noticed the colour needed more depth to match my hair colour. To correct this, I would have added a touch of eye shadow from my Ben Nye palette or mixed in shade D15 from the derma palette.